Flutter para desarrolladores de React Native
Aprende cómo aplicar los conocimientos de desarrollador de React Native al compilar aplicaciones Flutter.
Este documento es para desarrolladores de React Native (RN) que desean aplicar sus conocimientos existentes de RN para compilar aplicaciones móviles con Flutter. Si comprendes los fundamentos del framework de RN, entonces puedes usar este documento como una forma de comenzar a aprender sobre el desarrollo con Flutter.
Este documento se puede utilizar como un recetario (cookbook) para saltar de un lado a otro y encontrar las preguntas que sean más relevantes para tus necesidades.
Introducción a Dart para desarrolladores de JavaScript (ES6)
#Al igual que React Native, Flutter utiliza vistas de estilo reactivo. Sin embargo, mientras que RN se transcompila en widgets nativos, Flutter se compila directamente a código nativo. Flutter controla cada píxel de la pantalla, lo que evita problemas de rendimiento causados por la necesidad de un puente (bridge) de JavaScript.
Dart es un lenguaje fácil de aprender y ofrece las siguientes características:
- Proporciona un lenguaje de programación escalable y de código abierto para compilar aplicaciones web, de servidor y móviles.
- Proporciona un lenguaje orientado a objetos, de herencia simple, que utiliza una sintaxis de estilo C y que se compila de forma AOT (anticipada) a código nativo.
- Se transcompila opcionalmente a JavaScript.
- Admite interfaces y clases abstractas.
A continuación se describen algunos ejemplos de las diferencias entre JavaScript y Dart.
Punto de entrada
#JavaScript no tiene una función de entrada predefinida: tú defines el punto de entrada.
// JavaScript
function startHere() {
  // Can be used as entry point
}
En Dart, cada aplicación debe tener una función main() de nivel superior que sirve como punto
de entrada de la aplicación.
/// Dart
void main() {}
Pruébalo en DartPad.
Imprimir en la consola
#Para imprimir en la consola en Dart, usa print().
// JavaScript
console.log('Hello world!');
/// Dart
print('Hello world!');
Pruébalo en DartPad.
Variables
#Dart es seguro en cuanto a tipos (type-safe): utiliza una combinación de comprobación estática de tipos y comprobaciones en tiempo de ejecución para garantizar que el valor de una variable siempre coincida con el tipo estático de la variable. Aunque los tipos son obligatorios, algunas anotaciones de tipo son opcionales porque Dart realiza inferencia de tipos.
Crear y asignar variables
#En JavaScript, las variables no pueden ser tipadas.
En Dart, las variables deben estar tipadas explícitamente o el sistema de tipos debe inferir el tipo adecuado de forma automática.
// JavaScript
let name = 'JavaScript';
/// Dart
/// Both variables are acceptable.
String name = 'dart'; // Explicitly typed as a [String].
var otherName = 'Dart'; // Inferred [String] type.
Pruébalo en DartPad.
Para obtener más información, consulta el sistema de tipos de Dart (Dart's Type System).
Valor por defecto
#En JavaScript, las variables no inicializadas son undefined.
En Dart, las variables no inicializadas tienen un valor inicial de null.
Debido a que los números son objetos en Dart, incluso las variables no inicializadas con
tipos numéricos tienen el valor null.
// JavaScript
let name; // == undefined
// Dart
var name; // == null; raises a linter warning
int? x; // == null
Pruébalo en DartPad.
Para obtener más información, consulta la documentación sobre variables.
Comprobar nulos o cero
#En JavaScript, los valores como 1 o cualquier objeto no nulo
se tratan como true cuando se utiliza el operador de comparación ==.
// JavaScript
let myNull = null;
if (!myNull) {
  console.log('null is treated as false');
}
let zero = 0;
if (!zero) {
  console.log('0 is treated as false');
}
En Dart, solo el valor booleano true se trata como verdadero.
/// Dart
var myNull = potentiallyNull();
if (myNull == null) {
  print('use "== null" to check null');
}
var zero = 0;
if (zero == 0) {
  print('use "== 0" to check zero');
}
Pruébalo en DartPad.
Funciones
#Las funciones de Dart y JavaScript son generalmente similares. La diferencia principal es la declaración.
// JavaScript
function fn() {
  return true;
}
/// Dart
/// You can explicitly define the return type.
bool fn() {
  return true;
}
Pruébalo en DartPad.
Para obtener más información, consulta la documentación sobre funciones.
Programación asíncrona
#Futures
#Al igual que JavaScript, Dart admite la ejecución en un solo hilo. En JavaScript, el objeto Promise representa la finalización (o falla) eventual de una operación asíncrona y su valor resultante.
Dart utiliza objetos Future para manejar esto.
// JavaScript
class Example {
_getIPAddress() {
const url = 'https://httpbin.org/ip';
return fetch(url)
.then(response => response.json())
.then(responseJson => {
const ip = responseJson.origin;
return ip;
});
}
}
function main() {
const example = new Example();
example
._getIPAddress()
.then(ip => console.log(ip))
.catch(error => console.error(error));
}
main();
// Dart
import 'dart:convert';
import 'package:http/http.dart' as http;
class Example {
Future<String> _getIPAddress() {
final url = Uri.https('httpbin.org', '/ip');
return http.get(url).then((response) {
final ip = jsonDecode(response.body)['origin'] as String;
return ip;
});
}
}
void main() {
final example = Example();
example
._getIPAddress()
.then((ip) => print(ip))
.catchError((error) => print(error));
}
Para obtener más información, consulta la documentación sobre los
objetos Future.
async y await
#
La declaración de función async define una función asíncrona.
En JavaScript, la función async devuelve una Promise.
El operador await se utiliza para esperar una Promise.
// JavaScript
class Example {
async function _getIPAddress() {
const url = 'https://httpbin.org/ip';
const response = await fetch(url);
const json = await response.json();
const data = json.origin;
return data;
}
}
async function main() {
const example = new Example();
try {
const ip = await example._getIPAddress();
console.log(ip);
} catch (error) {
console.error(error);
}
}
main();
En Dart, una función async devuelve un Future,
y el cuerpo de la función se programa para ejecutarse más tarde.
El operador await se utiliza para esperar un Future.
// Dart
import 'dart:convert';
import 'package:http/http.dart' as http;
class Example {
Future<String> _getIPAddress() async {
final url = Uri.https('httpbin.org', '/ip');
final response = await http.get(url);
final ip = jsonDecode(response.body)['origin'] as String;
return ip;
}
}
/// An async function returns a `Future`.
/// It can also return `void`, unless you use
/// the `avoid_void_async` lint. In that case,
/// return `Future<void>`.
void main() async {
final example = Example();
try {
final ip = await example._getIPAddress();
print(ip);
} catch (error) {
print(error);
}
}
Para obtener más información, consulta la documentación sobre async y await.
Conceptos básicos
#¿Cómo creo una aplicación Flutter?
#Para crear una aplicación utilizando React Native,
ejecutarías create-react-native-app desde la línea de comandos.
create-react-native-app <projectname>
Para crear una aplicación en Flutter, realiza una de las siguientes acciones:
- Usa un IDE con los plugins de Flutter y Dart instalados.
- Usa el comando
flutter createdesde la línea de comandos. Asegúrate de que el SDK de Flutter esté en tu PATH.
flutter create <projectname>
Para obtener más información, consulta la sección Primeros pasos (Getting started), la cual te guía en la creación de una aplicación de contador de clics de botón. La creación de un proyecto de Flutter compila todos los archivos que necesitas para ejecutar una aplicación de ejemplo tanto en dispositivos Android como iOS.
¿Cómo ejecuto mi aplicación?
#En React Native, ejecutarías npm run o yarn run desde el directorio del
proyecto.
Puedes ejecutar aplicaciones Flutter de un par de formas:
- Usa la opción "run" en un IDE con los plugins de Flutter y Dart.
- Usa
flutter rundesde el directorio raíz del proyecto.
Tu aplicación se ejecutará en un dispositivo conectado, el simulador de iOS, o el emulador de Android.
For more information, see the Flutter Getting started documentation.
¿Cómo importo widgets?
#En React Native, necesitas importar cada componente requerido.
// React Native
import React from 'react';
import { StyleSheet, Text, View } from 'react-native';
In Flutter, to use widgets from the Material Design library,
import the material.dart package. To use iOS style widgets,
import the Cupertino library. To use a more basic widget set,
import the Widgets library.
Or, you can write your own widget library and import that.
import 'package:flutter/cupertino.dart';
import 'package:flutter/material.dart';
import 'package:flutter/widgets.dart';
import 'package:my_widgets/my_widgets.dart';
Whichever widget package you import, Dart pulls in only the widgets that are used in your app.
For more information, see the Flutter Widget Catalog.
¿Cuál es el equivalente de la aplicación "Hello world!" de React Native en Flutter?
#In React Native, the HelloWorldApp class extends React.Component and
implements the render method by returning a view component.
// React Native
import React from 'react';
import { StyleSheet, Text, View } from 'react-native';
const App = () => {
return (
<View style={styles.container}>
<Text>Hello world!</Text>
</View>
);
};
const styles = StyleSheet.create({
container: {
flex: 1,
backgroundColor: '#fff',
alignItems: 'center',
justifyContent: 'center'
}
});
export default App;
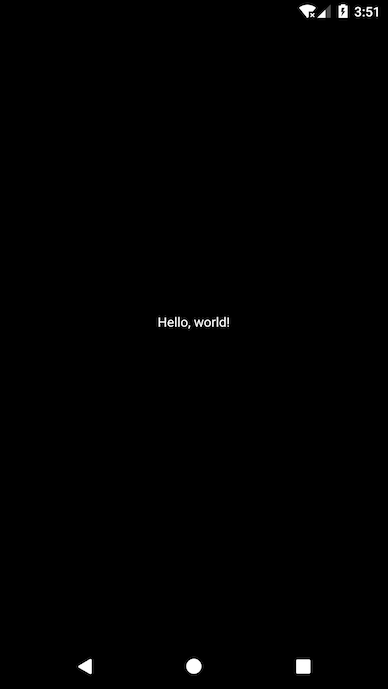
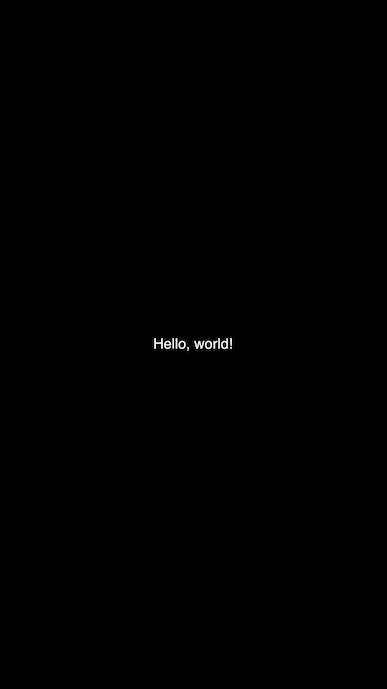
In Flutter, you can create an identical "Hello world!" app using the
Center and Text widgets from the core widget library.
The Center widget becomes the root of the widget tree and has one child,
the Text widget.
// Flutter
import 'package:flutter/material.dart';
void main() {
runApp(
const Center(
child: Text('Hello, world!', textDirection: TextDirection.ltr),
),
);
}
The following images show the Android and iOS UI for the basic Flutter "Hello world!" app.
Now that you've seen the most basic Flutter app, the next section shows how to take advantage of Flutter's rich widget libraries to create a modern, polished app.
¿Cómo uso los widgets y los anido para formar un árbol de widgets?
#En Flutter, casi todo es un widget.
Widgets are the basic building blocks of an app's user interface. You compose widgets into a hierarchy, called a widget tree. Each widget nests inside a parent widget and inherits properties from its parent. Even the application object itself is a widget. There is no separate "application" object. Instead, the root widget serves this role.
Un widget puede definir:
- Un elemento estructural, como un botón o un menú
- Un elemento estilístico, como una fuente o un esquema de color
- Un aspecto del diseño (layout), como el padding o la alineación
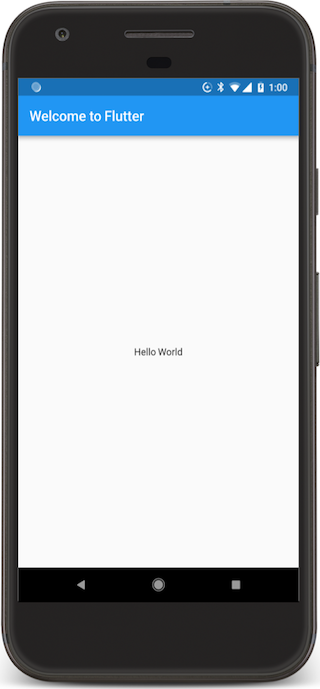
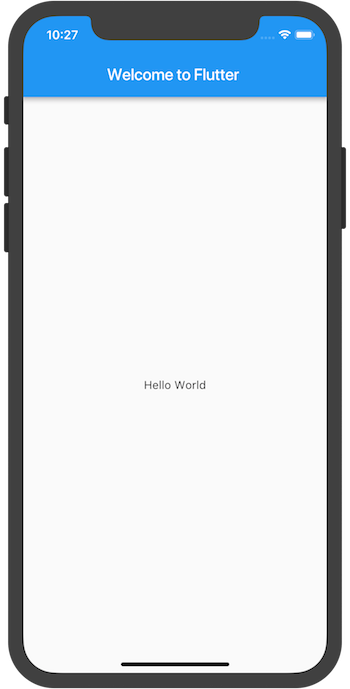
The following example shows the "Hello world!" app using widgets from the
Material library. In this example, the widget tree is nested inside the
MaterialApp root widget.
// Flutter
import 'package:flutter/material.dart';
void main() => runApp(const MyApp());
class MyApp extends StatelessWidget {
const MyApp({super.key});
@override
Widget build(BuildContext context) {
return MaterialApp(
title: 'Welcome to Flutter',
home: Scaffold(
appBar: AppBar(title: const Text('Welcome to Flutter')),
body: const Center(child: Text('Hello world')),
),
);
}
}
The following images show "Hello world!" built from Material Design widgets. You get more functionality for free than in the basic "Hello world!" app.
When writing an app, you'll use two types of widgets:
StatelessWidget
or StatefulWidget.
A StatelessWidget is just what it sounds like—a
widget with no state. A StatelessWidget is created once,
and never changes its appearance.
A StatefulWidget dynamically changes state based on data
received, or user input.
The important difference between stateless and stateful
widgets is that StatefulWidgets have a State object
that stores state data and carries it over
across tree rebuilds, so it's not lost.
In simple or basic apps it's easy to nest widgets, but as the code base gets larger and the app becomes complex, you should break deeply nested widgets into functions that return the widget or smaller classes. Creating separate functions and widgets allows you to reuse the components within the app.
¿Cómo creo componentes reutilizables?
#In React Native, you would define a function (or a class) to create a
reusable component and then use props methods to set
or return properties and values of the selected elements.
In the example below, the CustomCard function is defined
and then used inside a parent component.
// React Native
const CustomCard = ({ index, onPress }) => {
return (
<View>
<Text> Card {index} </Text>
<Button
title="Press"
onPress={() => onPress(index)}
/>
</View>
);
};
// Usage
<CustomCard onPress={this.onPress} index={item.key} />
In Flutter, define a class to create a custom widget and then reuse the
widget. You can also define and call a function that returns a
reusable widget as shown in the build function in the following example.
/// Flutter
class CustomCard extends StatelessWidget {
const CustomCard({super.key, required this.index, required this.onPress});
final int index;
final void Function() onPress;
@override
Widget build(BuildContext context) {
return Card(
child: Column(
children: <Widget>[
Text('Card $index'),
TextButton(onPressed: onPress, child: const Text('Press')),
],
),
);
}
}
class UseCard extends StatelessWidget {
const UseCard({super.key, required this.index});
final int index;
@override
Widget build(BuildContext context) {
/// Usage
return CustomCard(
index: index,
onPress: () {
print('Card $index');
},
);
}
}
In the previous example, the constructor for the CustomCard
class uses Dart's curly brace syntax { } to indicate named parameters.
To require these fields, either remove the curly braces from
the constructor, or add required to the constructor.
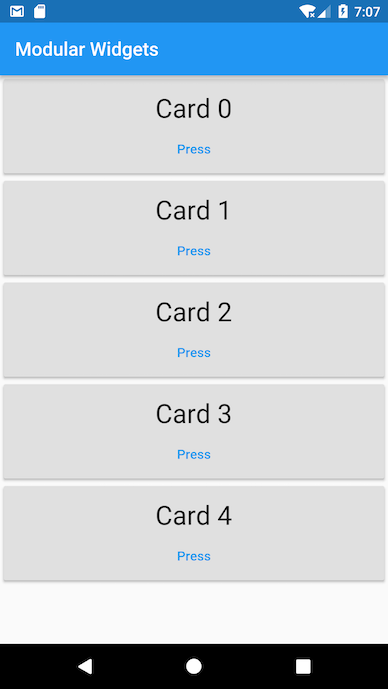
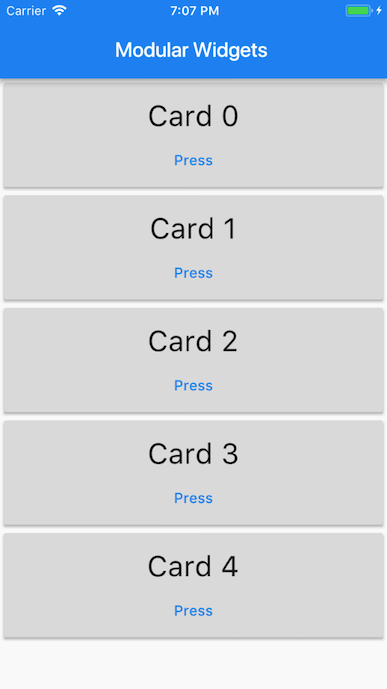
The following screenshots show an example of the reusable
CustomCard class.
Estructura del proyecto y recursos
#¿Dónde empiezo a escribir el código?
#Start with the lib/main.dart file.
It's autogenerated when you create a Flutter app.
// Dart
void main() {
  print('Hello, this is the main function.');
}
In Flutter, the entry point file is
{project_name}/lib/main.dart and execution
starts from the main function.
¿Cómo se estructuran los archivos en una aplicación Flutter?
#When you create a new Flutter project, it builds the following directory structure. You can customize it later, but this is where you start.
-
<project_name>/
- android/// Contains Android-specific files.
- build/// Stores iOS and Android build files.
- ios/// Contains iOS-specific files.
lib/// Contains externally accessible Dart source files.
- src/// Contains additional source files.
- main.dart// The Flutter entry point and the start of a new app. This is generated automatically when you create a Flutter project. It's where you start writing your Dart code.
- test/// Contains automated test files.
- pubspec.yaml// Contains the metadata for the Flutter app. This is equivalent to the package.json file in React Native.
¿Dónde coloco mis recursos y assets y cómo los uso?
#A Flutter resource or asset is a file that is bundled and deployed with your app and is accessible at runtime. Flutter apps can include the following asset types:
- Datos estáticos como archivos JSON
- Archivos de configuración
- Icons and images (JPEG, PNG, GIF, Animated GIF, WebP, Animated WebP, BMP, and WBMP)
Flutter uses the pubspec.yaml file,
located at the root of your project, to
identify assets required by an app.
flutter:
  assets:
    - assets/my_icon.png
    - assets/background.png
The assets subsection specifies files that should be included with the app.
Each asset is identified by an explicit path
relative to the pubspec.yaml file, where the asset file is located.
The order in which the assets are declared does not matter.
The actual directory used (assets in this case) does not matter.
However, while assets can be placed in any app directory, it's a
best practice to place them in the assets directory.
During a build, Flutter places assets into a special archive
called the asset bundle, which apps read from at runtime.
When an asset's path is specified in the assets' section of pubspec.yaml,
the build process looks for any files
with the same name in adjacent subdirectories.
These files are also included in the asset bundle
along with the specified asset. Flutter uses asset variants
when choosing resolution-appropriate images for your app.
In React Native, you would add a static image by placing the image file in a source code directory and referencing it.
<Image source={require('./my-icon.png')} />
// OR
<Image
  source={{
    url: 'https://reactnative.dev/img/tiny_logo.png'
  }}
/>
In Flutter, add a static image to your app
using the Image.asset constructor in a widget's build method.
Image.asset('assets/background.png');
For more information, see Adding Assets and Images in Flutter.
¿Cómo cargo imágenes a través de la red?
#In React Native, you would specify the uri in the
source prop of the Image component and also provide the
size if needed.
In Flutter, use the Image.network constructor to include
an image from a URL.
Image.network('https://docs.flutter.dev/assets/images/docs/owl.jpg');
¿Cómo instalo paquetes y plugins de paquetes?
#Flutter supports using shared packages contributed by other developers to the Flutter and Dart ecosystems. This allows you to quickly build your app without having to develop everything from scratch. Packages that contain platform-specific code are known as package plugins.
In React Native, you would use yarn add {package-name} or
npm install --save {package-name} to install packages
from the command line.
En Flutter, instala un paquete utilizando las siguientes instrucciones:
- To add the
google_sign_inpackage as a dependency, runflutter pub add:
flutter pub add google_sign_in
- Install the package from the command line by using
flutter pub get. If using an IDE, it often runsflutter pub getfor you, or it might prompt you to do so. - Importa el paquete en el código de tu aplicación como se muestra a continuación:
import 'package:flutter/material.dart';
For more information, see Using Packages and Developing Packages & Plugins.
You can find many packages shared by Flutter developers in the Flutter packages section of pub.dev.
Widgets de Flutter
#In Flutter, you build your UI out of widgets that describe what their view should look like given their current configuration and state.
Widgets are often composed of many small,
single-purpose widgets that are nested to produce powerful effects.
For example, the Container widget consists of
several widgets responsible for layout, painting, positioning, and sizing.
Specifically, the Container widget includes the LimitedBox,
ConstrainedBox, Align, Padding, DecoratedBox, and
Transform widgets.
Rather than subclassing Container to produce a customized effect, you can
compose these and other simple widgets in new and unique ways.
The Center widget is another example of how you can control the layout.
To center a widget, wrap it in a Center widget and then use layout
widgets for alignment, row, columns, and grids.
These layout widgets do not have a visual representation of their own.
Instead, their sole purpose is to control some aspect of another
widget's layout. To understand why a widget renders in a
certain way, it's often helpful to inspect the neighboring widgets.
For more information, see the Flutter Technical Overview.
For more information about the core widgets from the Widgets package,
see Flutter Basic Widgets,
the Flutter Widget Catalog,
or the Flutter Widget Index.
Vistas
#What is the equivalent of the View container?
#
In React Native, View is a container that supports layout with Flexbox,
style, touch handling, and accessibility controls.
In Flutter, you can use the core layout widgets in the Widgets
library, such as Container,
Column,
Row, and
Center.
For more information, see the Layout Widgets catalog.
What is the equivalent of FlatList or SectionList?
#
A List is a scrollable list of components arranged vertically.
In React Native, FlatList or SectionList are used to render simple or
sectioned lists.
// React Native
<FlatList
  data={[ ... ]}
  renderItem={({ item }) => <Text>{item.key}</Text>}
/>


ListView is Flutter's most commonly used scrolling widget.
The default constructor takes an explicit list of children.
ListView
is most appropriate for a small number of widgets.
For a large or infinite list, use ListView.builder,
which builds its children on demand and only builds
those children that are visible.
var data = ['Hello', 'World'];
return ListView.builder(
  itemCount: data.length,
  itemBuilder: (context, index) {
    return Text(data[index]);
  },
);
To learn how to implement an infinite scrolling list, see the official
infinite_list
sample.
¿Cómo uso un Canvas para dibujar o pintar?
#In React Native, canvas components aren't present
so third party libraries like react-native-canvas are used.
// React Native
const CanvasComp = () => {
const handleCanvas = (canvas) => {
const ctx = canvas.getContext('2d');
ctx.fillStyle = 'skyblue';
ctx.beginPath();
ctx.arc(75, 75, 50, 0, 2 * Math.PI);
ctx.fillRect(150, 100, 300, 300);
ctx.stroke();
};
return (
<View>
<Canvas ref={this.handleCanvas} />
</View>
);
}
In Flutter, you can use the CustomPaint
and CustomPainter
classes to draw to the canvas.
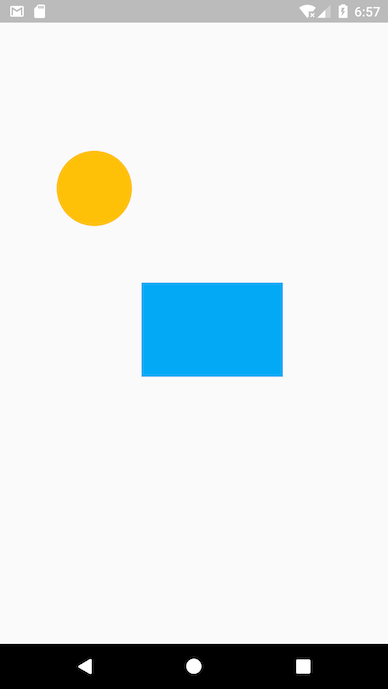
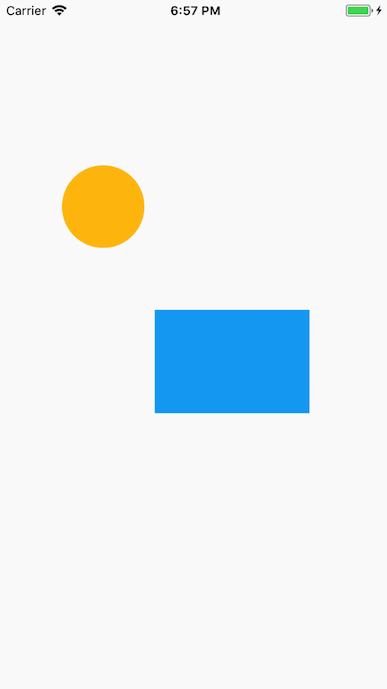
The following example shows how to draw during the paint phase using the
CustomPaint widget. It implements the abstract class, CustomPainter,
and passes it to CustomPaint's painter property.
CustomPaint subclasses must implement the paint()
and shouldRepaint() methods.
class MyCanvasPainter extends CustomPainter {
const MyCanvasPainter();
@override
void paint(Canvas canvas, Size size) {
final Paint paint = Paint()..color = Colors.amber;
canvas.drawCircle(const Offset(100, 200), 40, paint);
final Paint paintRect = Paint()..color = Colors.lightBlue;
final Rect rect = Rect.fromPoints(
const Offset(150, 300),
const Offset(300, 400),
);
canvas.drawRect(rect, paintRect);
}
@override
bool shouldRepaint(MyCanvasPainter oldDelegate) => false;
}
class MyCanvasWidget extends StatelessWidget {
const MyCanvasWidget({super.key});
@override
Widget build(BuildContext context) {
return const Scaffold(body: CustomPaint(painter: MyCanvasPainter()));
}
}
Diseños (Layouts)
#¿Cómo uso los widgets para definir propiedades de diseño (layout)?
#In React Native, most of the layout can be done with the props
that are passed to a specific component.
For example, you could use the style prop on the View component
in order to specify the flexbox properties.
To arrange your components in a column, you would specify a prop such as:
flexDirection: 'column'.
// React Native
<View
  style={{
    flex: 1,
    flexDirection: 'column',
    justifyContent: 'space-between',
    alignItems: 'center'
  }}
>


In Flutter, the layout is primarily defined by widgets specifically designed to provide layout, combined with control widgets and their style properties.
For example, the Column
and Row widgets
take an array of children and align them
vertically and horizontally respectively.
A Container
widget takes a combination of
layout and styling properties, and a
Center
widget centers its child widgets.
@override
Widget build(BuildContext context) {
  return Center(
    child: Column(
      children: <Widget>[
        Container(color: Colors.red, width: 100, height: 100),
        Container(color: Colors.blue, width: 100, height: 100),
        Container(color: Colors.green, width: 100, height: 100),
      ],
    ),
  );
Flutter provides a variety of layout widgets in its core widget library.
For example, Padding,
Align, and Stack.
For a complete list, see Layout Widgets.
¿Cómo superpongo widgets en capas?
#In React Native, components can be layered using absolute positioning.
Flutter uses the Stack
widget to arrange children widgets in layers.
The widgets can entirely or partially overlap the base widget.
The Stack widget positions its children relative to the edges of its box.
This class is useful if you simply want to overlap several children widgets.
@override
Widget build(BuildContext context) {
  return Stack(
    alignment: const Alignment(0.6, 0.6),
    children: <Widget>[
      const CircleAvatar(
        backgroundImage: NetworkImage(
          'https://avatars3.githubusercontent.com/u/14101776?v=4',
        ),
      ),
      Container(color: Colors.black45, child: const Text('Flutter')),
    ],
  );
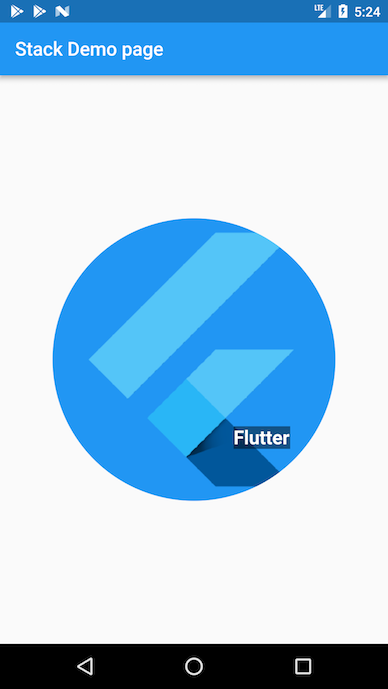
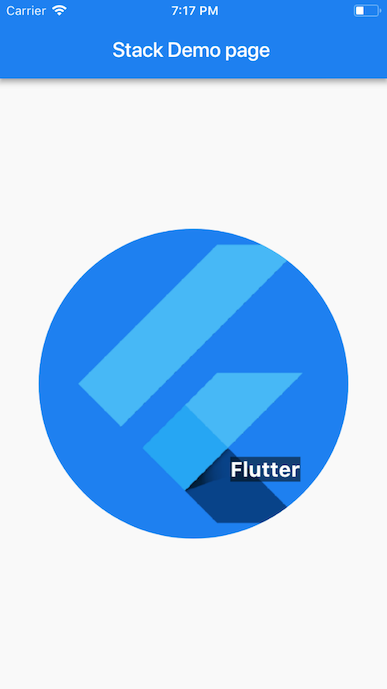
The previous example uses Stack to overlay a Container
(that displays its Text on a translucent black background)
on top of a CircleAvatar.
The Stack offsets the text using the alignment property
and Alignment coordinates.
For more information, see the Stack
class documentation.
Estilo
#¿Cómo estilizo mis componentes?
#In React Native, inline styling and stylesheets.create
are used to style components.
// React Native
<View style={styles.container}>
<Text style={{ fontSize: 32, color: 'cyan', fontWeight: '600' }}>
This is a sample text
</Text>
</View>
const styles = StyleSheet.create({
container: {
flex: 1,
backgroundColor: '#fff',
alignItems: 'center',
justifyContent: 'center'
}
});


In Flutter, a Text widget can take a TextStyle class
for its style property. If you want to use the same text
style in multiple places, you can create a
TextStyle
class and use it for multiple Text widgets.
const TextStyle textStyle = TextStyle(
color: Colors.cyan,
fontSize: 32,
fontWeight: FontWeight.w600,
);
return const Center(
child: Column(
children: <Widget>[
Text('Sample text', style: textStyle),
Padding(
padding: EdgeInsets.all(20),
child: Icon(
Icons.lightbulb_outline,
size: 48,
color: Colors.redAccent,
),
),
],
),
);
How do I use Icons and Colors?
#
React Native doesn't include support for icons so third party libraries are used.
In Flutter, importing the Material library also pulls in the rich set of Material icons and colors.
return const Icon(Icons.lightbulb_outline, color: Colors.redAccent);
When using the Icons class,
make sure to set uses-material-design: true in
the project's pubspec.yaml file.
This ensures that the MaterialIcons font,
which displays the icons, is included in your app.
In general, if you intend to use the Material library,
you should include this line.
name: my_awesome_application
flutter:
  uses-material-design: true
Flutter's Cupertino (iOS-style) package provides high
fidelity widgets for the current iOS design language.
To use the CupertinoIcons font,
add a dependency for cupertino_icons in your project's
pubspec.yaml file.
name: my_awesome_application
dependencies:
  cupertino_icons: ^1.0.8
To globally customize the colors and styles of components,
use ThemeData to specify default colors
for various aspects of the theme.
Set the theme property in MaterialApp to the ThemeData object.
The Colors
class provides colors
from the Material Design color palette.
The following example sets the color scheme from seed to deepPurple
and the text selection to red.
class SampleApp extends StatelessWidget {
const SampleApp({super.key});
@override
Widget build(BuildContext context) {
return MaterialApp(
title: 'Sample App',
theme: ThemeData(
colorScheme: ColorScheme.fromSeed(seedColor: Colors.deepPurple),
textSelectionTheme: const TextSelectionThemeData(
selectionColor: Colors.red,
),
),
home: const SampleAppPage(),
);
}
}
¿Cómo agrego temas de estilo?
#In React Native, common themes are defined for components in stylesheets and then used in components.
In Flutter, create uniform styling for almost everything
by defining the styling in the ThemeData
class and passing it to the theme property in the
MaterialApp
widget.
@override
Widget build(BuildContext context) {
  return MaterialApp(
    theme: ThemeData(primaryColor: Colors.cyan, brightness: Brightness.dark),
    home: const StylingPage(),
  );
}
A Theme can be applied even without using the MaterialApp widget.
The Theme
widget takes a ThemeData in its data parameter
and applies the ThemeData to all of its children widgets.
@override
Widget build(BuildContext context) {
  return Theme(
    data: ThemeData(primaryColor: Colors.cyan, brightness: brightness),
    child: Scaffold(
      backgroundColor: Theme.of(context).primaryColor,
      //...
    ),
  );
}
State Management
#State is information that can be read synchronously
when a widget is built or information
that might change during the lifetime of a widget.
To manage app state in Flutter,
use a StatefulWidget
paired with a State object.
For more information on ways to approach managing state in Flutter, see State management.
El StatelessWidget
#A StatelessWidget in Flutter is a widget
that doesn't require a state change—
it has no internal state to manage.
Stateless widgets are useful when the part of the user interface
you are describing does not depend on anything other than the
configuration information in the object itself and the
BuildContext
in which the widget is inflated.
AboutDialog,
CircleAvatar, and
Text are examples
of stateless widgets that subclass StatelessWidget.
import 'package:flutter/material.dart';
void main() => runApp(
const MyStatelessWidget(
text: 'StatelessWidget Example to show immutable data',
),
);
class MyStatelessWidget extends StatelessWidget {
const MyStatelessWidget({super.key, required this.text});
final String text;
@override
Widget build(BuildContext context) {
return Center(child: Text(text, textDirection: TextDirection.ltr));
}
}
The previous example uses the constructor of the MyStatelessWidget
class to pass the text, which is marked as final.
This class extends StatelessWidget—it contains immutable data.
The build method of a stateless widget is typically called
in only three situations:
- Cuando el widget se inserta en un árbol
- Cuando el padre del widget cambia su configuración
- When an
InheritedWidgetit depends on, changes
El StatefulWidget
#A StatefulWidget
is a widget that changes state.
Use the setState method to manage the
state changes for a StatefulWidget.
A call to setState() tells the Flutter
framework that something has changed in a state,
which causes an app to rerun the build() method
so that the app can reflect the change.
State is information that can be read synchronously when a widget
is built and might change during the lifetime of the widget.
It's the responsibility of the widget implementer to ensure that
the state object is promptly notified when the state changes.
Use StatefulWidget when a widget can change dynamically.
For example, the state of the widget changes by typing into a form,
or moving a slider.
Or, it can change over time—perhaps a data feed updates the UI.
Checkbox, Radio,
Slider, InkWell,
Form, and
TextField
are examples of stateful widgets that subclass
StatefulWidget.
The following example declares a StatefulWidget
that requires a createState() method.
This method creates the state object that manages the widget's state,
_MyStatefulWidgetState.
class MyStatefulWidget extends StatefulWidget {
const MyStatefulWidget({super.key, required this.title});
final String title;
@override
State<MyStatefulWidget> createState() => _MyStatefulWidgetState();
}


The following state class, _MyStatefulWidgetState,
implements the build() method for the widget.
When the state changes, for example, when the user toggles
the button, setState() is called with the new toggle value.
This causes the framework to rebuild this widget in the UI.
class _MyStatefulWidgetState extends State<MyStatefulWidget> {
bool showText = true;
bool toggleState = true;
Timer? t2;
void toggleBlinkState() {
setState(() {
toggleState = !toggleState;
});
if (!toggleState) {
t2 = Timer.periodic(const Duration(milliseconds: 1000), (t) {
toggleShowText();
});
} else {
t2?.cancel();
}
}
void toggleShowText() {
setState(() {
showText = !showText;
});
}
@override
Widget build(BuildContext context) {
return Scaffold(
body: Center(
child: Column(
children: <Widget>[
if (showText)
const Text('This execution will be done before you can blink.'),
Padding(
padding: const EdgeInsets.only(top: 70),
child: ElevatedButton(
onPressed: toggleBlinkState,
child: toggleState
? const Text('Blink')
: const Text('Stop Blinking'),
),
),
],
),
),
);
}
}
¿Cuáles son las mejores prácticas para StatefulWidget y StatelessWidget?
#Aquí hay algunas cosas a considerar al diseñar tu widget.
- Determine whether a widget should be
a
StatefulWidgetor aStatelessWidget.
In Flutter, widgets are either Stateful or Stateless—depending on whether they depend on a state change.
- If a widget changes—the user interacts with it or a data feed interrupts the UI, then it's Stateful.
- If a widget is final or immutable, then it's Stateless.
- Determine which object manages the widget's state (for a
StatefulWidget).
En Flutter, hay tres formas principales de gestionar el state:
- El widget gestiona su propio state
- El widget padre gestiona el state del widget
- Un enfoque híbrido (mix-and-match)
Al decidir qué enfoque utilizar, considera los siguientes principios:
- If the state in question is user data, for example the checked or unchecked mode of a checkbox, or the position of a slider, then the state is best managed by the parent widget.
- If the state in question is aesthetic, for example an animation, then the widget itself best manages the state.
- En caso de duda, deja que el widget padre gestione el state del widget hijo.
- Hereda de (subclass) StatefulWidget y State.
The MyStatefulWidget class manages its own state—it extends
StatefulWidget, it overrides the createState()
method to create the State object,
and the framework calls createState() to build the widget.
In this example, createState() creates an instance of
_MyStatefulWidgetState, which
is implemented in the next best practice.
class MyStatefulWidget extends StatefulWidget {
const MyStatefulWidget({super.key, required this.title});
final String title;
@override
State<MyStatefulWidget> createState() => _MyStatefulWidgetState();
}
class _MyStatefulWidgetState extends State<MyStatefulWidget> {
@override
Widget build(BuildContext context) {
//...
}
}
- Agrega el StatefulWidget en el árbol de widgets.
Add your custom StatefulWidget to the widget tree
in the app's build method.
class MyStatelessWidget extends StatelessWidget {
// This widget is the root of your application.
const MyStatelessWidget({super.key});
@override
Widget build(BuildContext context) {
return const MaterialApp(
title: 'Flutter Demo',
home: MyStatefulWidget(title: 'State Change Demo'),
);
}
}
Props
#In React Native, most components can be customized when they are
created with different parameters or properties, called props.
These parameters can be used in a child component using this.props.
// React Native
const CustomCard = ({ index, onPress }) => {
return (
<View>
<Text> Card {index} </Text>
<Button
title='Press'
onPress={() => onPress(index)}
/>
</View>
);
};
const App = () => {
const onPress = (index) => {
console.log('Card ', index);
};
return (
<View>
<FlatList
data={[ /* ... */ ]}
renderItem={({ item }) => (
<CustomCard onPress={onPress} index={item.key} />
)}
/>
</View>
);
};
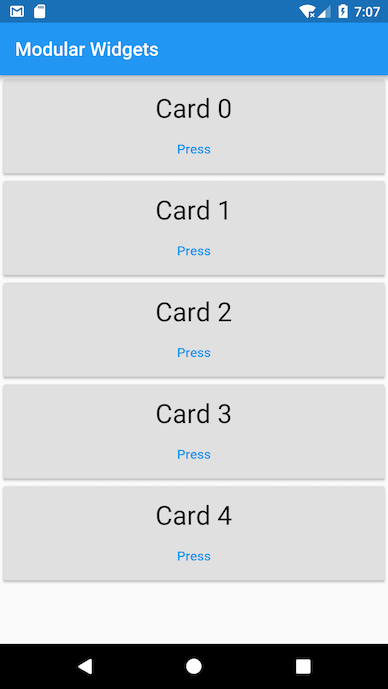
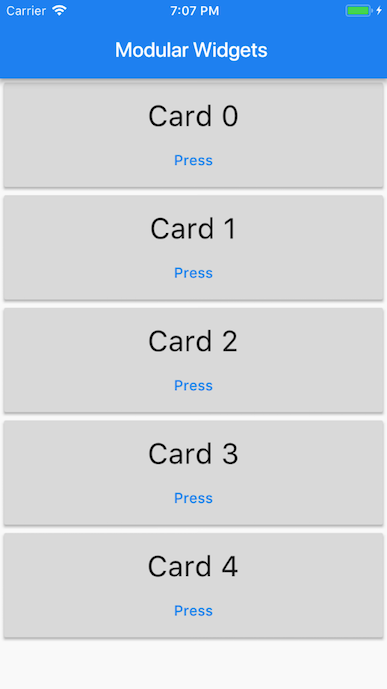
In Flutter, you assign a local variable or function marked
final with the property received in the parameterized constructor.
/// Flutter
class CustomCard extends StatelessWidget {
const CustomCard({super.key, required this.index, required this.onPress});
final int index;
final void Function() onPress;
@override
Widget build(BuildContext context) {
return Card(
child: Column(
children: <Widget>[
Text('Card $index'),
TextButton(onPressed: onPress, child: const Text('Press')),
],
),
);
}
}
class UseCard extends StatelessWidget {
const UseCard({super.key, required this.index});
final int index;
@override
Widget build(BuildContext context) {
/// Usage
return CustomCard(
index: index,
onPress: () {
print('Card $index');
},
);
}
}
Almacenamiento local
#If you don't need to store a lot of data, and it doesn't require
structure, you can use shared_preferences which allows you to
read and write persistent key-value pairs of primitive data
types: booleans, floats, ints, longs, and strings.
¿Cómo almaceno pares clave-valor persistentes que son globales para la aplicación?
#In React Native, you use the setItem and getItem functions
of the AsyncStorage component to store and retrieve data
that is persistent and global to the app.
// React Native
const [counter, setCounter] = useState(0)
...
await AsyncStorage.setItem( 'counterkey', json.stringify(++this.state.counter));
AsyncStorage.getItem('counterkey').then(value => {
  if (value != null) {
    setCounter(value);
  }
});
In Flutter, use the shared_preferences
plugin to
store and retrieve key-value data that is persistent and global
to the app. The shared_preferences plugin wraps
NSUserDefaults on iOS and SharedPreferences on Android,
providing a persistent store for simple data.
To add the shared_preferences package as a dependency, run flutter pub add:
flutter pub add shared_preferences
import 'package:shared_preferences/shared_preferences.dart';
To implement persistent data, use the setter methods
provided by the SharedPreferences class.
Setter methods are available for various primitive
types, such as setInt, setBool, and setString.
To read data, use the appropriate getter method provided
by the SharedPreferences class. For each
setter there is a corresponding getter method,
for example, getInt, getBool, and getString.
Future<void> updateCounter() async {
  final prefs = await SharedPreferences.getInstance();
  int? counter = prefs.getInt('counter');
  if (counter is int) {
    await prefs.setInt('counter', ++counter);
  }
  setState(() {
    _counter = counter;
  });
}
Enrutamiento
#Most apps contain several screens for displaying different types of information. For example, you might have a product screen that displays images where users could tap on a product image to get more information about the product on a new screen.
In Android, new screens are new Activities. In iOS, new screens are new ViewControllers. In Flutter, screens are just Widgets! And to navigate to new screens in Flutter, use the Navigator widget.
¿Cómo navego entre pantallas?
#In React Native, there are three main navigators: StackNavigator, TabNavigator, and DrawerNavigator. Each provides a way to configure and define the screens.
// React Native
const MyApp = TabNavigator(
  { Home: { screen: HomeScreen }, Notifications: { screen: tabNavScreen } },
  { tabBarOptions: { activeTintColor: '#e91e63' } }
);
const SimpleApp = StackNavigator({
  Home: { screen: MyApp },
  stackScreen: { screen: StackScreen }
});
export default (MyApp1 = DrawerNavigator({
  Home: {
    screen: SimpleApp
  },
  Screen2: {
    screen: drawerScreen
  }
}));
En Flutter, se utilizan dos widgets principales para navegar entre pantallas:
A Navigator is defined as a widget that manages a set of child
widgets with a stack discipline. The navigator manages a stack
of Route objects and provides methods for managing the stack,
like Navigator.push
and Navigator.pop.
A list of routes might be specified in the MaterialApp
widget,
or they might be built on the fly, for example, in hero animations.
The following example specifies named routes in the MaterialApp widget.
class NavigationApp extends StatelessWidget {
// This widget is the root of your application.
const NavigationApp({super.key});
@override
Widget build(BuildContext context) {
return MaterialApp(
//...
routes: <String, WidgetBuilder>{
'/a': (context) => const UsualNavScreen(),
'/b': (context) => const DrawerNavScreen(),
},
//...
);
}
}
To navigate to a named route, the Navigator.of()
method is used to specify the BuildContext
(a handle to the location of a widget in the widget tree).
The name of the route is passed to the pushNamed function to
navigate to the specified route.
Navigator.of(context).pushNamed('/a');
You can also use the push method of Navigator which
adds the given Route
to the history of the
navigator that most tightly encloses the given BuildContext,
and transitions to it. In the following example,
the MaterialPageRoute
widget is a modal route that
replaces the entire screen with a platform-adaptive
transition. It takes a WidgetBuilder
as a required parameter.
Navigator.push(
  context,
  MaterialPageRoute<void>(builder: (context) => const UsualNavScreen()),
);
¿Cómo uso la navegación por pestañas y la navegación por cajón (drawer)?


#In Material Design apps, there are two primary options for Flutter navigation: tabs and drawers. When there is insufficient space to support tabs, drawers provide a good alternative.
Navegación por pestañas
#In React Native, createBottomTabNavigator
and TabNavigation are used to
show tabs and for tab navigation.
// React Native
import { createBottomTabNavigator } from 'react-navigation';
const MyApp = TabNavigator(
{ Home: { screen: HomeScreen }, Notifications: { screen: tabNavScreen } },
{ tabBarOptions: { activeTintColor: '#e91e63' } }
);
Flutter provides several specialized widgets for drawer and tab navigation:
TabController-
Coordinates the tab selection between a
TabBarand aTabBarView. TabBarMuestra una fila horizontal de pestañas.
TabCrea una pestaña TabBar de Material Design.
TabBarViewMuestra el widget que corresponde a la pestaña seleccionada actualmente.
class _MyAppState extends State<MyApp> with SingleTickerProviderStateMixin {
late TabController controller = TabController(length: 2, vsync: this);
@override
Widget build(BuildContext context) {
return TabBar(
controller: controller,
tabs: const <Tab>[
Tab(icon: Icon(Icons.person)),
Tab(icon: Icon(Icons.email)),
],
);
}
}
A TabController is required to coordinate the tab selection
between a TabBar and a TabBarView.
The TabController constructor length argument is the total
number of tabs. A TickerProvider is required to trigger
the notification whenever a frame triggers a state change.
The TickerProvider is vsync. Pass the
vsync: this argument to the TabController constructor
whenever you create a new TabController.
The TickerProvider
is an interface implemented
by classes that can vend Ticker
objects.
Tickers can be used by any object that must be notified whenever a
frame triggers, but they're most commonly used indirectly via an
AnimationController.
AnimationControllers
need a TickerProvider to obtain their Ticker.
If you are creating an AnimationController from a State,
then you can use the TickerProviderStateMixin
or SingleTickerProviderStateMixin
classes to obtain a suitable TickerProvider.
The Scaffold widget wraps a new
TabBar widget and
creates two tabs. The TabBarView widget
is passed as the body parameter of the Scaffold widget.
All screens corresponding to the TabBar widget's tabs are
children to the TabBarView widget along with the same TabController.
class _NavigationHomePageState extends State<NavigationHomePage>
with SingleTickerProviderStateMixin {
late TabController controller = TabController(length: 2, vsync: this);
@override
Widget build(BuildContext context) {
return Scaffold(
bottomNavigationBar: Material(
color: Colors.blue,
child: TabBar(
tabs: const <Tab>[
Tab(icon: Icon(Icons.person)),
Tab(icon: Icon(Icons.email)),
],
controller: controller,
),
),
body: TabBarView(
controller: controller,
children: const <Widget>[HomeScreen(), TabScreen()],
),
);
}
}
Navegación por cajón (drawer)
#In React Native, import the needed react-navigation packages and then use
createDrawerNavigator and DrawerNavigation.
// React Native
export default (MyApp1 = DrawerNavigator({
  Home: {
    screen: SimpleApp
  },
  Screen2: {
    screen: drawerScreen
  }
}));
In Flutter, we can use the Drawer widget in combination with a
Scaffold to create a layout with a Material Design drawer.
To add a Drawer to an app, wrap it in a Scaffold widget.
The Scaffold widget provides a consistent
visual structure to apps that follow the
Material Design guidelines. It also supports
special Material Design components,
such as Drawers, AppBars, and SnackBars.
The Drawer widget is a Material Design panel that slides
in horizontally from the edge of a Scaffold to show navigation
links in an application. You can
provide a ElevatedButton, a
Text widget,
or a list of items to display as the child to the Drawer widget.
In the following example, the ListTile
widget provides the navigation on tap.
@override
Widget build(BuildContext context) {
  return Drawer(
    elevation: 20,
    child: ListTile(
      leading: const Icon(Icons.change_history),
      title: const Text('Screen2'),
      onTap: () {
        Navigator.of(context).pushNamed('/b');
      },
    ),
  );
}
The Scaffold widget also includes an AppBar widget that automatically
displays an appropriate IconButton to show the Drawer when a Drawer is
available in the Scaffold. The Scaffold automatically handles the
edge-swipe gesture to show the Drawer.
@override
Widget build(BuildContext context) {
  return Scaffold(
    drawer: Drawer(
      elevation: 20,
      child: ListTile(
        leading: const Icon(Icons.change_history),
        title: const Text('Screen2'),
        onTap: () {
          Navigator.of(context).pushNamed('/b');
        },
      ),
    ),
    appBar: AppBar(title: const Text('Home')),
    body: Container(),
  );
}
Detección de gestos y manejo de eventos táctiles
#To listen for and respond to gestures, Flutter supports taps, drags, and scaling. The gesture system in Flutter has two separate layers. The first layer includes raw pointer events, which describe the location and movement of pointers, (such as touches, mice, and styli movements), across the screen. The second layer includes gestures that describe semantic actions and consist of one or more pointer movements.
¿Cómo agrego un escuchador (listener) de clics o presiones a un widget?
#In React Native, listeners are added to components
using PanResponder or the Touchable components.
// React Native
<TouchableOpacity
  onPress={() => {
    console.log('Press');
  }}
  onLongPress={() => {
    console.log('Long Press');
  }}
>
  <Text>Tap or Long Press</Text>
</TouchableOpacity>
For more complex gestures and combining several touches into
a single gesture, PanResponder
is used.
// React Native
const App = () => {
const panResponderRef = useRef(null);
useEffect(() => {
panResponderRef.current = PanResponder.create({
onMoveShouldSetPanResponder: (event, gestureState) =>
!!getDirection(gestureState),
onPanResponderMove: (event, gestureState) => true,
onPanResponderRelease: (event, gestureState) => {
const drag = getDirection(gestureState);
},
onPanResponderTerminationRequest: (event, gestureState) => true
});
}, []);
return (
<View style={styles.container} {...panResponderRef.current.panHandlers}>
<View style={styles.center}>
<Text>Swipe Horizontally or Vertically</Text>
</View>
</View>
);
};


In Flutter, to add a click (or press) listener to a widget,
use a button or a touchable widget that has an onPress: field.
Or, add gesture detection to any widget by wrapping it
in a GestureDetector.
@override
Widget build(BuildContext context) {
  return GestureDetector(
    child: Scaffold(
      appBar: AppBar(title: const Text('Gestures')),
      body: const Center(
        child: Column(
          mainAxisAlignment: MainAxisAlignment.center,
          children: <Widget>[
            Text('Tap, Long Press, Swipe Horizontally or Vertically'),
          ],
        ),
      ),
    ),
    onTap: () {
      print('Tapped');
    },
    onLongPress: () {
      print('Long Pressed');
    },
    onVerticalDragEnd: (value) {
      print('Swiped Vertically');
    },
    onHorizontalDragEnd: (value) {
      print('Swiped Horizontally');
    },
  );
}
For more information, including a list of
Flutter GestureDetector callbacks,
see the GestureDetector class.
Realizar peticiones de red HTTP


#Fetching data from the internet is common for most apps. And in Flutter,
the http package provides the simplest way to fetch data from the internet.
¿Cómo obtengo datos de llamadas a APIs?
#React Native provides the Fetch API for networking—you make a fetch request and then receive the response to get the data.
// React Native
const [ipAddress, setIpAddress] = useState('')
const _getIPAddress = () => {
fetch('https://httpbin.org/ip')
.then(response => response.json())
.then(responseJson => {
setIpAddress(responseJson.origin);
})
.catch(error => {
console.error(error);
});
};
Flutter uses the http package.
Para agregar el paquete http como una dependencia, ejecuta flutter pub add:
flutter pub add http
Flutter uses the dart:io
core HTTP support client.
To create an HTTP Client, import dart:io.
import 'dart:io';
The client supports the following HTTP operations: GET, POST, PUT, and DELETE.
final Uri url = Uri.parse('https://httpbin.org/ip');
final HttpClient httpClient = HttpClient();
Future<void> getIPAddress() async {
final request = await httpClient.getUrl(url);
final response = await request.close();
final responseBody = await response.transform(utf8.decoder).join();
final ip = jsonDecode(responseBody)['origin'] as String;
setState(() {
_ipAddress = ip;
});
}
Entrada de formulario
#Text fields allow users to type text into your app so they can be
used to build forms, messaging apps, search experiences, and more.
Flutter provides two core text field widgets:
TextField
and TextFormField.
¿Cómo uso los widgets de campos de texto?
#In React Native, to enter text you use a TextInput component to show a text
input box and then use the callback to store the value in a variable.
// React Native
const [password, setPassword] = useState('')
...
<TextInput
  placeholder="Enter your Password"
  onChangeText={password => setPassword(password)}
/>
<Button title="Submit" onPress={this.validate} />


In Flutter, use the TextEditingController
class to manage a TextField widget.
Whenever the text field is modified,
the controller notifies its listeners.
Listeners read the text and selection properties to
learn what the user typed into the field.
You can access the text in TextField
by the text property of the controller.
final TextEditingController _controller = TextEditingController();
@override
Widget build(BuildContext context) {
return Column(
children: [
TextField(
controller: _controller,
decoration: const InputDecoration(
hintText: 'Type something',
labelText: 'Text Field',
),
),
ElevatedButton(
child: const Text('Submit'),
onPressed: () {
showDialog(
context: context,
builder: (context) {
return AlertDialog(
title: const Text('Alert'),
content: Text('You typed ${_controller.text}'),
);
},
);
},
),
],
);
}
In this example, when a user clicks on the submit button an alert dialog
displays the current text entered in the text field.
This is achieved using an AlertDialog
widget that displays the alert message, and the text from
the TextField is accessed by the text property of the
TextEditingController.
¿Cómo uso los widgets de formulario?
#In Flutter, use the Form
widget where
TextFormField
widgets along with the submit
button are passed as children.
The TextFormField widget has a parameter called
onSaved
that takes a callback and executes
when the form is saved. A FormState
object is used to save, reset, or validate
each FormField that is a descendant of this Form.
To obtain the FormState, you can use Form.of()
with a context whose ancestor is the Form,
or pass a GlobalKey to the Form constructor and call
GlobalKey.currentState().
@override
Widget build(BuildContext context) {
  return Form(
    key: formKey,
    child: Column(
      children: <Widget>[
        TextFormField(
          validator: (value) {
            if (value != null && value.contains('@')) {
              return null;
            }
            return 'Not a valid email.';
          },
          onSaved: (val) {
            _email = val;
          },
          decoration: const InputDecoration(
            hintText: 'Enter your email',
            labelText: 'Email',
          ),
        ),
        ElevatedButton(onPressed: _submit, child: const Text('Login')),
      ],
    ),
  );
}
The following example shows how Form.save() and formKey
(which is a GlobalKey), are used to save the form on submit.
void _submit() {
  final form = formKey.currentState;
  if (form != null && form.validate()) {
    form.save();
    showDialog(
      context: context,
      builder: (context) {
        return AlertDialog(
          title: const Text('Alert'),
          content: Text('Email: $_email, password: $_password'),
        );
      },
    );
  }
}
Código específico de la plataforma
#When building a cross-platform app, you want to re-use as much code as possible across platforms. However, scenarios might arise where it makes sense for the code to be different depending on the OS. This requires a separate implementation by declaring a specific platform.
En React Native, se utilizaría la siguiente implementación:
// React Native
if (Platform.OS === 'ios') {
  return 'iOS';
} else if (Platform.OS === 'android') {
  return 'android';
} else {
  return 'not recognised';
}
En Flutter, utiliza la siguiente implementación:
final platform = Theme.of(context).platform;
if (platform == TargetPlatform.iOS) {
  return 'iOS';
}
if (platform == TargetPlatform.android) {
  return 'android';
}
if (platform == TargetPlatform.fuchsia) {
  return 'fuchsia';
}
return 'not recognized ';
Depuración
#¿Qué herramientas puedo usar para depurar mi aplicación en Flutter?
#Utiliza la suite DevTools para depurar aplicaciones de Flutter o Dart.
DevTools incluye soporte para el análisis de rendimiento (profiling), examinar el heap, inspeccionar el árbol de widgets, registrar diagnósticos, depuración, observar líneas de código ejecutadas, y depurar fugas de memoria (memory leaks) y fragmentación de memoria. Para obtener más información, consulta la documentación de DevTools.
If you're using an IDE, you can debug your application using the IDE's debugger.
¿Cómo realizo un hot reload?
#Flutter's Stateful Hot Reload feature helps you quickly and easily experiment, build UIs, add features, and fix bugs. Instead of recompiling your app every time you make a change, you can hot reload your app instantly. The app is updated to reflect your change, and the current state of the app is preserved.
First, from your preferred IDE, enable autosave and hot reloads on save.
VS Code
Add the following to your .vscode/settings.json file:
json "files.autoSave": "afterDelay", "dart.flutterHotReloadOnSave": "all",
Android Studio and IntelliJ
* Open Settings > Tools > Actions on Save and select
Configure autosave options.
- Check the option to Save files if the IDE is idle for X seconds.
- Recommended: Set a small delay duration. For example, 2 seconds.
* Open Settings > Languages & Frameworks > Flutter.
- Check the option to Perform hot reload on save.
In React Native, the shortcut is ⌘R for the iOS Simulator and tapping R twice on Android emulators.
In Flutter, if you are using IntelliJ IDE or Android Studio,
you can select Save All (⌘s/ctrl-s), or you can click the
Hot Reload button on the toolbar. If you
are running the app at the command line using flutter run,
type r in the Terminal window.
You can also perform a full restart by typing R in the
Terminal window.
¿Cómo accedo al menú de desarrollador dentro de la aplicación?
#In React Native, the developer menu can be accessed by shaking your device: ⌘D for the iOS Simulator or ⌘M for Android emulator.
In Flutter, if you are using an IDE, you can use the IDE tools. If you start
your application using flutter run you can also access the menu by typing
h
in the terminal window, or type the following shortcuts:
| Acción | Atajo de terminal | Funciones y propiedades de depuración |
|---|---|---|
| Jerarquía de widgets de la aplicación | w |
debugDumpApp() |
| Árbol de renderizado de la aplicación | t |
debugDumpRenderTree() |
| Capas | L |
debugDumpLayerTree() |
| Accesibilidad | S (traversal order) orU (inverse hit test order) |
debugDumpSemantics() |
| Para alternar el inspector de widgets | i |
WidgetsApp.showWidgetInspectorOverride |
| Para alternar la visualización de líneas de construcción | p |
debugPaintSizeEnabled |
| To simulate different operating systems | o |
defaultTargetPlatform |
| To display the performance overlay | P |
WidgetsApp. showPerformanceOverlay |
| To save a screenshot to flutter. png | s |
|
| To quit | q |
Animación
#Well-designed animation makes a UI feel intuitive, contributes to the look and feel of a polished app, and improves the user experience. Flutter's animation support makes it easy to implement simple and complex animations. The Flutter SDK includes many Material Design widgets that include standard motion effects, and you can easily customize these effects to personalize your app.
In React Native, Animated APIs are used to create animations.
In Flutter, use the Animation
class and the AnimationController
class.
Animation is an abstract class that understands its
current value and its state (completed or dismissed).
The AnimationController class lets you
play an animation forward or in reverse,
or stop animation and set the animation
to a specific value to customize the motion.
How do I add a simple fade-in animation?
#In the React Native example below, an animated component,
FadeInView is created using the Animated API.
The initial opacity state, final state, and the
duration over which the transition occurs are defined.
The animation component is added inside the Animated component,
the opacity state fadeAnim is mapped
to the opacity of the Text component that we want to animate,
and then, start() is called to start the animation.
// React Native
const FadeInView = ({ style, children }) => {
const fadeAnim = useRef(new Animated.Value(0)).current;
useEffect(() => {
Animated.timing(fadeAnim, {
toValue: 1,
duration: 10000
}).start();
}, []);
return (
<Animated.View style={{ ...style, opacity: fadeAnim }}>
{children}
</Animated.View>
);
};
...
<FadeInView>
<Text> Fading in </Text>
</FadeInView>
...
To create the same animation in Flutter, create an
AnimationController
object named controller
and specify the duration. By default, an AnimationController
linearly produces values that range from 0.0 to 1.0,
during a given duration. The animation controller generates a new value
whenever the device running your app is ready to display a new frame.
Typically, this rate is around 60 values per second.
When defining an AnimationController,
you must pass in a vsync object.
The presence of vsync prevents offscreen
animations from consuming unnecessary resources.
You can use your stateful object as the vsync by adding
TickerProviderStateMixin to the class definition.
An AnimationController needs a TickerProvider,
which is configured using the vsync argument on the constructor.
A Tween describes the interpolation between a
beginning and ending value or the mapping from an input
range to an output range. To use a Tween object
with an animation, call the Tween object's animate()
method and pass it the Animation object that you want to modify.
For this example, a FadeTransition
widget is used and the opacity property is
mapped to the animation object.
To start the animation, use controller.forward().
Other operations can also be performed using the
controller such as fling() or repeat().
For this example, the FlutterLogo
widget is used inside the FadeTransition widget.
import 'package:flutter/material.dart';
void main() {
runApp(const Center(child: LogoFade()));
}
class LogoFade extends StatefulWidget {
const LogoFade({super.key});
@override
State<LogoFade> createState() => _LogoFadeState();
}
class _LogoFadeState extends State<LogoFade>
with SingleTickerProviderStateMixin {
late Animation<double> animation;
late AnimationController controller;
@override
void initState() {
super.initState();
controller = AnimationController(
duration: const Duration(milliseconds: 3000),
vsync: this,
);
final CurvedAnimation curve = CurvedAnimation(
parent: controller,
curve: Curves.easeIn,
);
animation = Tween(begin: 0.0, end: 1.0).animate(curve);
controller.forward();
}
@override
void dispose() {
controller.dispose();
super.dispose();
}
@override
Widget build(BuildContext context) {
return FadeTransition(
opacity: animation,
child: const SizedBox(height: 300, width: 300, child: FlutterLogo()),
);
}
}

How do I add swipe animation to cards?
#In React Native, either the PanResponder or
third-party libraries are used for swipe animation.


In Flutter, to add a swipe animation, use the
Dismissible
widget and nest the child widgets.
return Dismissible(
  key: Key(widget.key.toString()),
  onDismissed: (dismissDirection) {
    cards.removeLast();
  },
  child: Container(
    //...
  ),
);
React Native and Flutter widget equivalent components
#The following table lists commonly-used React Native components mapped to the corresponding Flutter widget and common widget properties.
| React Native Component | Flutter Widget | Descripción |
|---|---|---|
Button |
ElevatedButton
|
A basic raised button. |
| onPressed [required] | The callback when the button is tapped or otherwise activated. | |
| Child | The button's label. | |
Button |
TextButton |
A basic flat button. |
| onPressed [required] | The callback when the button is tapped or otherwise activated. | |
| Child | The button's label. | |
ScrollView |
ListView |
A scrollable list of widgets arranged linearly. |
| children | ( <Widget> [ ]) List of child widgets to display. | |
| controller | [
ScrollController
] An object that can be used to control a scrollable widget. |
|
| itemExtent | [ double ] If non-null, forces the children to have the given extent in the scroll direction. | |
| scroll Direction | [
Axis
] The axis along which the scroll view scrolls. |
|
FlatList |
ListView.builder
|
The constructor for a linear array of widgets that are created on demand. |
| itemBuilder [required] | [
IndexedWidgetBuilder
] helps in building the children on demand. This callback is called only with indices greater than or equal to zero and less than the itemCount. |
|
| itemCount | [ int ] improves the ability of the ListView to estimate the maximum scroll extent. |
|
Imagen |
Imagen |
A widget that displays an image. |
| image [required] | The image to display. | |
| Image. asset | Several constructors are provided for the various ways that an image can be specified. | |
| width, height, color, alignment | The style and layout for the image. | |
| fit | Inscribing the image into the space allocated during layout. | |
Modal |
ModalRoute |
A route that blocks interaction with previous routes. |
| animation | The animation that drives the route's transition and the previous route's forward transition. | |
ActivityIndicator |
CircularProgressIndicator
|
A widget that shows progress along a circle. |
| strokeWidth | The width of the line used to draw the circle. | |
| backgroundColor | The progress indicator's background color. The current theme's
ThemeData.backgroundColor
by default. |
|
ActivityIndicator |
LinearProgressIndicator
|
A widget that shows progress along a line. |
| value | The value of this progress indicator. | |
RefreshControl |
RefreshIndicator
|
A widget that supports the Material "swipe to refresh" idiom. |
| color | The progress indicator's foreground color. | |
| onRefresh | A function that's called when a user drags the refresh indicator far enough to demonstrate that they want the app to refresh. | |
View |
Container |
A widget that surrounds a child widget. |
View |
Column |
A widget that displays its children in a vertical array. |
View |
Row |
A widget that displays its children in a horizontal array. |
View |
Center |
A widget that centers its child within itself. |
View |
Padding |
A widget that insets its child by the given padding. |
| padding [required] | [ EdgeInsets ] The amount of space to inset the child. | |
TouchableOpacity |
GestureDetector
|
A widget that detects gestures. |
| onTap | A callback when a tap occurs. | |
| onDoubleTap | A callback when a tap occurs at the same location twice in quick succession. | |
TextInput |
TextInput |
The interface to the system's text input control. |
| controller | [
TextEditingController
] used to access and modify text. |
|
Text |
Text |
The Text widget that displays a string of text with a single style. |
| datos | [ String ] The text to display. | |
| textDirection | [
TextAlign
] The direction in which the text flows. |
|
Switch |
Switch |
A material design switch. |
| value [required] | [ boolean ] Whether this switch is on or off. | |
| onChanged [required] | [ callback ] Called when the user toggles the switch on or off. |
A menos que se indique lo contrario, la documentación de este sitio refleja Flutter 3.44.0. Página actualizada por última vez el 2026-05-05. Ver código fuente oreportar un problema.